The Bread Monk
  • Home
  • My Bread Blog
  • Breadhead Videos
  • Recipes
  • Fr. Dom's Books
  • Events/Programs
  • Shortcut Stollen
  • New Page

Pizza and Herbs

2/28/2012

0 Comments

 
I recently made pizza for the local council of the Knights of Columbus (for which I am chaplain) and made two discoveries:
1) Italian Beef Pizza with sautéed veggies is also REALLY good using Cajun Beef and a couple dashes of Louisiana Hot Sauce.
2) Velouté sauce, lightly cooked chopped asparagus, and diced lemon pepper chicken (left over from monk supper) topped with baby Swiss makes a great combo, too.

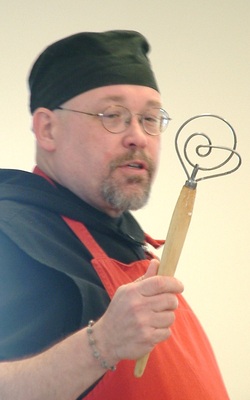
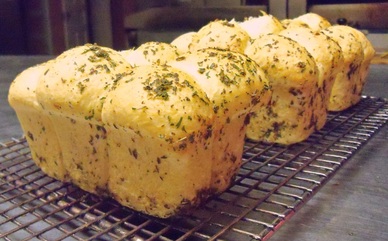
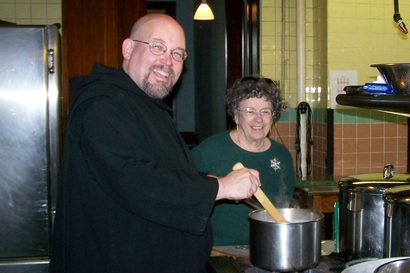
Tonight I gave a talk on Monastic Herb Gardens to the Ottawa Garden Club, which reminded me that I forgot to post about an exciting new project: an herb guild from the Chicago suburbs is coming to make an overnight Herb Retreat with me in June.  Our high school has two buildings for our boarding students that aren't used in the summer and they are perfect for this sort of thing.  They are going to arrive on a Saturday monring, get a tour of the abbey gardens and grounds, eat a light lunch on the patio of the west garden by the koi pond, and then have some time for prayer, reflection, journaling, walks or naps.  In the late afternoon we'll have a pizza dough making session and create some herbal sauces for our pizza supper, and after eating join the monks for evening prayer.  Sunday morning we'll do a lectio divina exercise (after a multigrain sourdough waffle breakfast accompanied by scrambled eggs with an herb sauce and a fruit medley), attend conventual Mass, and finish off with a lunch of spring salad greens, homemade Italian Wedding Soup and crusty bread.  The main benefit for the retreatants, of course, is being away from the city on 800 acres of beautiful grounds and woods.  I'm really looking forward to seeing how this first one goes, because I suspect I could book several for the summer.
0 Comments

Stage Rats, par-bakes, and fresh bread

2/15/2012

1 Comment

 
Picture
Tonight I had several projects that needed doing on the stage, and a few things I had to get ready for a pizza and wine party this weekend (see the Upcoming Events page), so I had the Stage Rats meet me in the kitchen.  I sent a crew over to paint flats and find period hats and props for The Music Man while Brandon G. and I worked on par-baking crusts.  As many Rat alumni will attest, you can't work for me as stage manager for long before you drafted into culinary duties as well.  The crew finished the projects in no time, and then came to hang out in the kitchen as we finished the crusts (nine 14" and three 16"), and then to sample some bread Brandon had made at home and brought to share.  Some kids had to get home a little earlier (school night and all) but the older students who stuck around also got fresh, hot bread made with the last of the pizza dough, slathered with butter and anointed with Saint Bede honey. 
          I make an effort to create these kinds of memorable experiences for our students: bonfires with marshmallows, pizza parties, baking sessions, a spontaneous decision to make kettle corn or funnel cakes, etc.  I'm well aware from my own life in the theatre that these kinds of activities are what cement the students together, and turn them into a real community and not just a stage crew.  Having a place to fit in, a safe place where you're not going to get pressured into making bad choices, where you might get teased a bit but never mocked or ostracized---there's not much that is more important to adolescents, or to their parents.   Not bragging---when parents make a fuss over how great the program is, I duck my head and mumble, "Just doin' my job, ma'am."  Because ultimately, that is my job: to help them find their unique place in this world, and take their rightful place in the next.

1 Comment

A couple of cool tools

2/13/2012

0 Comments

 
Picture
Whenever I give a bread demo, I usually show some of my favorite hand tools, among them the dough whisk to the left.  Also called a "brotpisker" , this Scandanavian tool is a must-have for the beginning baker and the serious Breadhead.  The swirl of rigid wire at the end of the tool makes mixing pancake and muffin batter a snap, especially valuable since you don't want to overbeat quick breads or the finished product can be tough.  I find it even more useful for yeast breads, as you can incorporate a cup of flour into a yeast bread recipe about three times faster with a dough whisk than with a wooden spoon.  My brotpisker is over 30 years old and has seen a lot of use.  The newer ones are usually made in Poland and are not quite as sturdy but will certainly give you years of service. 

Picture
Another useful gadget is the flour wand, shown here in the closed position.  This tool was invented in Victorian times when pie making at home became increasingly popular.   The tool allows you to get flour out of a bag or canister without touching it with your hands, which is especially useful when your hands are sticky with pie crust or bread dough.  You squeeze the tool to open the spring (see below), swirl it around in the flour and then close it.  The flour gets caught in the spring, and you can them use to tool to control the amount of flour you sprinkle on your kneading board or pie crust while rolling.  Great for pizza, too!

Picture
Both the flour wand and the dough whisk are available from a variety of online sources, including King Arthur Flour,  Shop in the Kitchen, and Amazon.
You can sometimes find them at shops like Fantes in Philadelphia or chains like Sur La Table, but not every store carries them so you may want to phone first before making a specal trip.  The Colony Store in Bishop Hill (
101 West Main St., Bishop Hill, IL, 61419, 309-927-3596) almost always has the dough whisks in stock.

0 Comments

Baking for the Garramone Family Christmas

12/26/2011

0 Comments

 
We had our family Christmas here at the abbey today, as we have for the past 25 years or so.  It's usually the Sunday after Christmas, but since Christmas itself fell on a Sunday, we couldn't wait until New Year's!  In recent years we've had a different theme for our celebration: pizza parties, Christmas Brunch, County Fair foods (celebrating Christmas with corn dogs, funnel cakes and lemonade shake-ups!).  This year my sisters chose "Merry Little Christmas" so all our food was miniaturized.  The buffet included, among other things, Little Smokies, little sweet and sour meatballs, mini-quiches, bite-sized ravs with homemade sauce, mini-eclairs (made by my talented cousin Gina), and tiny and exquisitely decorated Bundt cakes made by my endlessly creative sister Angela---I only wish I had taken a picture, because they were totally blog-worthy.  
Picture
My contribution was Pull-Apart Garlic Bread, a family favorite I've been making for decades.  The orginal recipe came from Rhodes frozen dough, and Mom won first prize at the Heart of Illinois Fair several years with her version.  I've tweaked it slightly (mostly by adding more garlic!) and you should feel free to do the same.  Download the recipe here.

Picture
My other contribution was Italian wedding soup, another family favorite.  I had never heard of it until a salesman showed up on the set of Breaking Bread at KETC in season three and told me about this traditional soup made with tiny beef and veal meatballs in chicken stock, with vegetables and a few chiffonade-cut greens (escorale, endive, spinach or cabbage) to garnish.  The name of the soup is a bit of a mistranslation:  the original Italian name is minestra maritata ("married soup"), which is a reference to the fact that green vegetables and meat go well together rather than to any wedding tradition.   Small pasta like ditalini, orzo, or stars are usually  added, although I use acini de pepe pasta, which look like little beads or BB's and can be found in some larger grocery stores (I've gotten them at Hyvee and at Walmart, but they don't always stock them) or Italian grocery stores.  Unfortunately, I can't offer a recipe, since I make it grandmother-style--you know, a little of this, a handful of that--in large batches for my families, both biological and monastic.  But there are plenty of versions online: Giada De Laurentiis' recipe is one of the most tradition ones I've seen.

0 Comments

Caramel Corn: OK, it's not bread, but you know you want some!

12/7/2011

5 Comments

 
Picture
I make a lot of caramel corn, usually using popcorn leftover from the concession stand during the basketball season.  So although most recipes call for unbuttered, unsalted popcorn, you can use just about anything that isn’t stale.  Also, most caramel corn recipes instruct you to mix the caramel with the popcorn and then put it in a roasting pan in the oven, stirring it every 10 or 15 minutes for up to an hour.  As far as I can tell, the purpose of this oven step is to re-melt the caramel so that you can get it to coat the popcorn evenly.  I have learned through much experimentation that the better method is to get a large (8 to 10 quart) metal pan or pot with a handle in which to put the popcorn, and preheat both the popcorn and the pan while you are making the caramel.  When the caramel goes on the corn in the pan, it doesn’t lose heat as quickly, and you can often get a batch made in a single mixing.  If you are used to the oven method, try this at least once and tell me what you think.

8 to 10 quart pan with an oven safe handle
small saucepan
candy thermometer
heavy wooden spoon
(2) 9″ x 13″ cookie sheets

3 ½ quarts of popped popcorn (sort out the unpopped kernels)
1 stick  (½ cup) of butter (not margarine or spread)
1 cup light brown sugar
¼ cup light corn syrup (not the lo-calorie)
½ tsp. vanilla extract
popcorn salt (optional)

Picture
Preheat oven to 350 degrees F.  Place the popcorn in an 8 to 10 quart metal pot or pan with an oven-safe handle (you may want to lightly spray the interior of pan with pan release first) and warm in the oven.  Place butter, brown sugar, corn syrup and vanilla in a small saucepan over medium heat, stirring constantly, until ingredients are melted and well mixed.  Clip the candy thermometer on the side of the pan so that the tip touches the mixture but not the bottom of the pan.  Keep stirring the mixture occasionally.

Picture
When the caramel temperature reaches about 250 degrees F., take the popcorn pan out of the oven and have it nearby on the counter along with an oven mitt to hold the hot pan.  When the caramel temperature reaches 300 degrees F., turn off the heat, remove the thermometer and pour the caramel onto the popcorn.  Using a heavy wooden spoon, stir the caramel into the popcorn until the corn is evenly coated.   (You may to put the pan back in the oven to re-melt the caramel if you don’t work quickly enough.)

Picture
Divide the caramel corn between the two baking sheets and spread it out flat.  Sprinkle lightly with popcorn salt if desired (the salty/sweet combination rocks!).  Let cool until hard, then break apart gently and store in an airtight container.

Picture
Want to download the recipe without all the photos and extra spacing?  Click here for a printable version.

5 Comments
Forward>>

    Author

    Fr. Dominic Garramone AKA 
    the Bread Monk

    Categories

    All
    Breadhead Bookshelf
    Breakfast Breads
    Buns Rolls And Biscuits
    Craftsy
    Donuts
    Equipment
    Ethnic Breads
    Events
    Gluten Free
    Herbal Breads
    Holidays
    Lake Thunderbird
    Memories Of Mama
    Multigrain Breads
    Pastries
    Pizza
    Places To Visit
    Quick Breads
    Reflections While The Bread Is Rising
    Savory Breads
    Sourdough
    Spirituality
    Stuff Besides Bread
    Sweet Breads
    The Classics
    Tools Of The Trade

    RSS Feed

    Archives

    June 2024
    December 2023
    September 2022
    April 2022
    March 2022
    February 2022
    January 2022
    October 2021
    May 2021
    April 2021
    March 2021
    February 2021
    August 2020
    July 2020
    May 2020
    February 2020
    October 2019
    June 2019
    September 2018
    July 2018
    May 2018
    April 2018
    March 2018
    February 2018
    January 2018
    December 2017
    November 2017
    August 2017
    July 2017
    June 2017
    May 2017
    April 2017
    March 2017
    February 2017
    January 2017
    December 2016
    November 2016
    October 2016
    September 2016
    August 2016
    June 2016
    May 2016
    April 2016
    February 2016
    December 2015
    November 2015
    October 2015
    September 2015
    August 2015
    July 2015
    June 2015
    May 2015
    April 2015
    March 2015
    December 2014
    November 2014
    October 2014
    September 2014
    August 2014
    July 2014
    June 2014
    May 2014
    April 2014
    March 2014
    February 2014
    January 2014
    December 2013
    November 2013
    October 2013
    September 2013
    August 2013
    July 2013
    June 2013
    May 2013
    April 2013
    February 2013
    January 2013
    December 2012
    November 2012
    October 2012
    September 2012
    August 2012
    July 2012
    June 2012
    May 2012
    April 2012
    March 2012
    February 2012
    January 2012
    December 2011
    November 2011
    October 2011
    September 2011

Web Hosting by FatCow